Friday, June 18, 2010

Tulle Tutu

I got this idea from a Disney Family Fun magazine and ran with it.  (My tutorial is basically the same, just more detailed, with more pictures and my measurements were different.)

Materials:
6 yd tulle
1" elastic cut to waist 
Step One: Cut your strips of tulle.  I measured mine to be 3 inches in width.  (Too thin and you will have to do a lot of ties; too thick and lots of elastic will show between knots.)
Step Two: Since the tulle I bought comes in 52" I cut each strip in half.  That gave me a finished piece of 3"x26".  I wanted mine to drape down pretty far.  You could also cut it in thirds or fourths easily...fourths wouldn't drape much though.
Step Three: Sew elastic closed.  I used a zigzag stitch to do this, more give.  I cut my elastic to 19" (My daughter's estimated waist since she was sleeping at the time.)  I then overlapped about 3/4".  You do NOT need to add extra for the overlap, if you do the tutu could end up being too loose.
Step Four: Stretch the elastic across a binder or book to use as a base while tying.  The more you stretch it, the more knots you will need, which will make it more full.
Step Five: Start tying knots.
Make a cute pattern.  Keep going until you get the finished product...
...cuteness in a tutu!
She is finally learning to pose and smile for my pictures.
She'll even dance in some instances.  (You should have seen her getting down in Old Navy the other day.  So funny.)
As you can tell I couldn't pick a favorite of her dancing.
Thought of putting the tutu on my son for about 0.2 seconds before I realized my husband would kill me.
Umm...WWF Smackdown?!?


Wednesday, June 9, 2010

Gathered Headband

LOOK AT THIS CUTE HEADBAND.
I saw a cute gathered headband on someone's blog a while back but didn't save the link.  GRRR...Well, It has popped into my head a couple of times and I decided that I could come up with a pattern myself.

Here is the close-up.
I took awesome pictures of the whole process...more than I remember to usually take.  THEN MY CAMERA FLIPPED OUT AND I HAD TO REFORMAT THE MEMORY CARD AND LOST ALL OF THE PICTURES.

So, I guess the actual tutorial will have to wait until the next time I make one.  

If you are an experienced sewer, you can use the same basic concepts for making a crayon roll to make this but do two things different:
1. Make sure you attach a piece of ribbon to BOTH end of the headband so they will tie together at the base of your head.
2. Obviously don't add the pocket for the crayons.  Basically double the length of the top piece of fabric to allow for the extra fabric needed for gathering.

Sorry about the pictures.  I suspect I'll have the actual tutorial in the next two weeks because I really want to make another one already...

Sunday, June 6, 2010

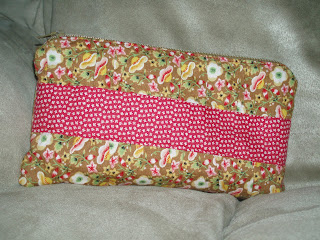
Gathered Clutch from Noodlehead

I have been L.O.V.I.N.G. this since I made it a could of weeks ago.  The beauty is it was made from scrap I already had and a zipper I had to purchase. 
So easy to throw the license and debit card into along with my phone and shopping list.  If I need a big diaper bag I take this instead of a purse so I have one less thing to carry because I can throw this in the diaper bag.  The fabric doesn't really allow you to see it, but the flowered fabric is gathered, my new favorite technique.  You can find the tutorial here at Noodlehead.  Good Job with this one Anna, and thank you to Dana at MADE for featuring her about a month ago.