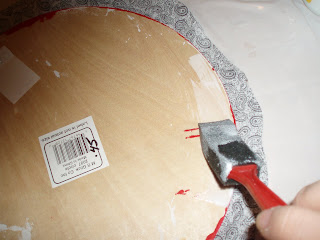
I found these wooden dots at the Thrift Store (where I get a lot of supplies lately due to the monthly budget changes) for 49 cents each. I decided to use them to decorate the kids' room.
Materials:
Wooden dots
Fabric
Coordinating Paint
sponge brush
Mod Podge
How to:
Step 1: Cut the fabric to be slightly larger (about 1/2) than the wooden dots. (Note the red paint. You do not need to paint them first; the ones I bought had been previously painted.)
Step 2: Apply Mod Podge using your sponge brush to the front side of the dot, stretching your fabric out evenly. Flip the dot over and apply Mod Podge to the edges of the back.
Step 3: Fold the fabric over the back of the dot. I sponged a little extra Mod Podge over the top of the fabric to hold it better and prevent fraying. Allow to dry completely.
I painted the black ones with black acrylic paint. Be careful to make it smooth and make your strokes in the same direction if you use acrylic paint. I would actually suggest using spray paint instead if you have it around. I didn't have any around and I had a HUGE bottle of black acrylic paint for some reason...
Another shot of the dots in the room.
PS - Just as a side note, apparently Mod Podge doesn't stick to styrofoam I found out during a project recently. So, if you plan on using Styrofoam shapes use craft glue or a low temp glue gun instead.
.JPG)


I really like those, so fun!
ReplyDelete